Showing posts with label Project. Show all posts

Saturday, February 22, 2014

Tea for Two, or Fifty-Two

Today was my big stamp club meeting and it was my turn to host the make and take.  Since I was clueless what to do for such a large group of people, I reached out to my friends for ideas or suggestions.  My friend, Other Judy, came up with the idea of a cute tea bag holder.  You can use it as a gift insert or mount it on a card.  It's a fun little thing that could easily be made taller to hold a gift card.

It's basically a tri-fold with one corner snipped away to create a little pocket.  We put some decoration on the front and again on the inside and it was done.  To make it easy we kept our decorations to paper flowers but it would look great stamped up with tea themed stamps as well (that's what Other Judy did).
 
 
The greeting says: I wish we could sit down together and have a cup of tea, but since we can't when you have this one I hope you'll think of me.
 
The Fine Print: Thank you Other Judy for such a fabulous idea that was well-received by all.  Papers and flowers from my stash, TEA dies by A Muse Studio.  If you want a hot-to-trot idea you can substitute a condom in lieu of tea. Va-Va-Voom. Anytime you come across a quickie project that could be taught to a group of 40-50 lemme know!

Wednesday, January 29, 2014

What's on My Workdesk?

What's on my workdesk, you ask?  Why, a lot of the same old stuff and a cat.  Aren't you glad you asked?
I've worked on some of the projects in progress/leftover bits from last week but some of them are still stashed on the desk.  There are some new ones added on top to boot.
Dio wants me to show off the stuff to the left of my desk.  The top row has two CD hanging file cases that store dies in them.  The silver and black case holds my Copic markers. Under that is a wooden paper holder with paper it in.  The bookcase has bins with drawers with papers by color, ribbons in boxes and magazines.   Left of Dio's head is a three-tiered plastic case that is crammed full of washi tape.  The white drawers under it have stickers, embellishments and paper pads.
Here is a get well card my Momie sent me earlier this month. It was such a nice surprise to find in my mailbox.  And, Lookit! She made it.
The Tic Tac treats is a project my stamp group will work on this evening.  This is definitely not an original design.  I saw this over at Susan's Simple Stampin' blog and just had to try it out.  I don't usually make anything but cards, so this is really out of the box for me.  Check out Susan's blog for easy to follow directions.

The Fine Print: Stamps on Get Well card by MAMBI and Copper Leaf, papers on Tic Tac boxes by A Muse Studio, punches by Stampin' Up, ribbon and twine from my stash.  Yes, that's the twine I have two rolls of each color that I showed off at a previous WOYWW.

Saturday, December 24, 2011

Today's Forecast: Snow


I have some more snow themed cards to share with you from my December Annie's Attic card making kit.  The reasoning behind subscribing to this monthly kit was to always have a project on hand that I could pick up and take with me when my crafty friends and I get together someplace away from home.  I'm terrible at coming up with a project to go with all the parts and pieces, so these kits had most everything in one place.  They come with a instructional booklet that tells you what else you will need to complete the projects, so as long as I make sure to bring those along I'm golden.  That doesn't mean I finish the project though.  Just remember, I'm easily distracted! 


The Fine Print: Pretty much everything from Annie's Attic card making kit, some DCWV glitter paper and a Marvy punch was included.  No snow was harmed in the making of these cards.

Monday, December 19, 2011

Wander or Unfinished Business Part II


Yesterday I shared with you a card that I completed after having the parts for it lying around in my crafting space for years.  I actually made several of those cards, changing the greeting around a little bit.  That was not the only unfinished business I took care of.

But first, another true confession: I love card kits.  I love the idea that all the parts are there in one little package for you to play with.  I love to buy them to take with me when I meet friends for crafting activities since I have a hard time thinking up an entire project in advance.  I tend to work as I go and since I can’t bring my whole crafting room with me, it is nice to have a kit to work on.  Um… but I rarely finish up the kits.

That brings us back to yesterday’s post where I said I sometimes start a project and don’t finish it.  I got on a roll working on those floral cards yesterday and decided to finish off a card kit that I started but never finished.  

I remember sitting down at home and starting this kit and enjoying it a lot.  I wondered why I didn't finish the cards off and right away I found my answer.  I had glued some pieces onto the wrong card base and had to pry them off .  I guess that discouraged me because that is where it ended.  The two cards in question are the ones below.  Can you even tell?!  Nope! 
 
  I changed the wording on the Sweet Home card.  It was to say Welcome Home but I wasn't keen on that phrase being as I don't know anyone who needs to be welcomed back.
I changed this card around from its original design as well, adding the "travel" and "roam" words as I felt the card needed a bit more to it.  Once you give me those alphabet stickers, I'm a mad woman!
I like the gas pump on this card as anyone on a road trip knows the importance of a stop at the gas station. I once read that the little gas pump icon on your dashboard shows you which side of the vehicle your gas tank opening is located on.  If the pump is on the right like the card above it is on the passenger side.  If the pump is on the left the opening is on the driver's side.  Before you commit that to memory, it is false as evidenced by the right handled pump icon in my truck that has a driver's side gas cap.  

That finished off that card kit and now I have some spare cards lying around.  I wish I had done this last weekend because I needed a transportation themed card for a card exchange on Saturday and one of these would have been perfect.  That's me, a day late and a buck-fifty short (inflation, ya'know).

The Fine Print: Wander card kit and extra alphabet stickers by Basic Gray, star punch (roam card) by EK Success). 

Sunday, December 11, 2011

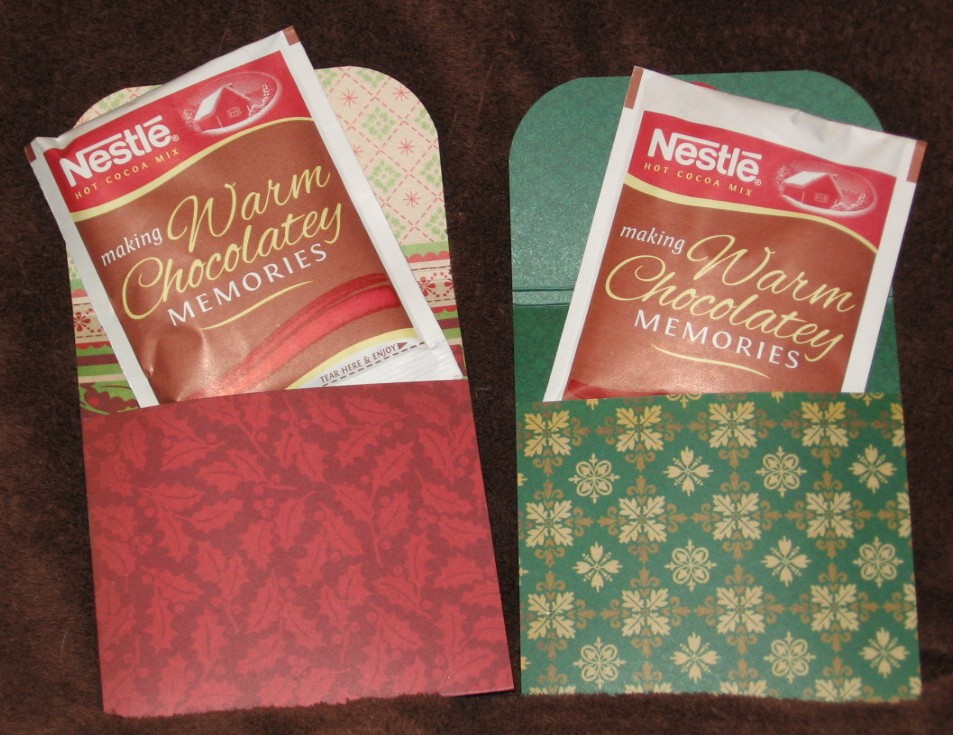
Making Warm Chocolately Memories

I confess.  I do not have any warm chocolately memories.  I might have some scalding hot burn-your-tongue chocolately memories if I dig deep into the abyss that is my memory.

I had a very busy but not very crafty weekend, so the only thing I have to share with you is the project I made for a dinner with crafting friends this coming week.  I made these hot chocolate packet holders to share with my friends.

They are made with patterned cardstock, some of it is pre-glittered and others aren't.  They are scored and folded to make a packet holder.  The sides are held shut with red line tape.  The top flap is decorated with a scalloped circle and layered paper flowers held on with a brad.  To keep the flap shut the scalloped circle is hiding a nickel under it.  Besides, isn't it always nice to receive the gift of cash?!  :-)

The Fine Print--Patterned papers by DCWV and Basic Gray, corner round by Fiskars, scalloped circle by Marvy, paper flowers by SEI and Prima, hot chocolate by Nestle.